
How to Setup DetectX in Jamf Pro
1) Create a CustomTrigger Policy to Install DetectX Swift
Create a new policy in your Site and name it Install – DetectX Swift. Set the only trigger to “Custom” and enter the custom trigger “install_detectx”. Set the Frequency to “Ongoing”, since we want this policy to be available whenever we need it. If desired the policy can also be enabled for Self Service.
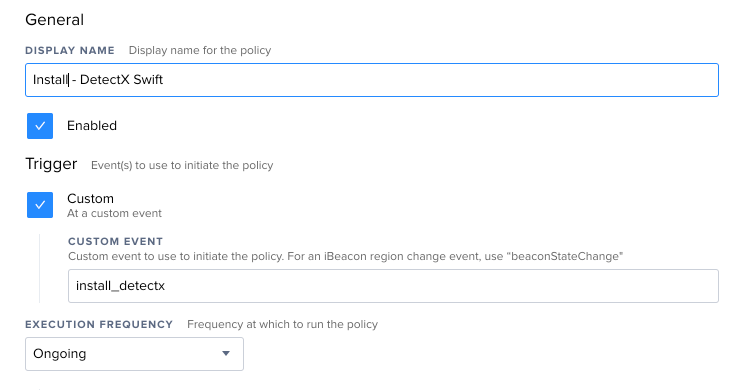
In the Packages tab, add your DetectX Swift package named like “NCSU-Campus-DetectX_Swiftxxxx.pkg” where xxxx is a version number and the license package named NCSU-Campus-DetectX_Swift_License.pkg. Do not enable the “Update Inventory” option in the Maintenance tab.
Set an appropriate Scope; make the policy available to all clients in the Site.
Save the policy.
2) Create a Policy to Run DetectX Swift Searches
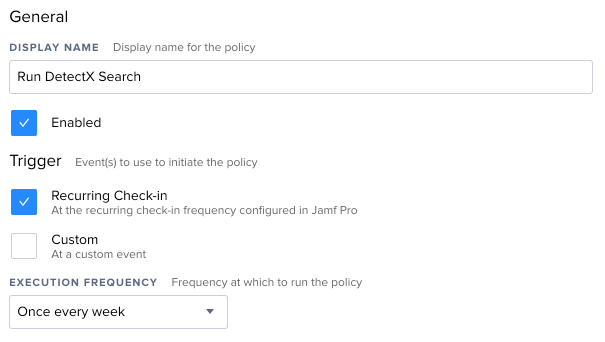
Create a new policy and give it a suitable name, like “Run DetectX Search.”
Set the Trigger to “Recurring Check-in,” and the Frequency to “Once per week.” If your environment demands more frequent or less frequent scanning, adjust the frequency accordingly. I will, however, caution against an “Ongoing” frequency so as not to inflate your Jamf Pro database with excessive inventory reports.
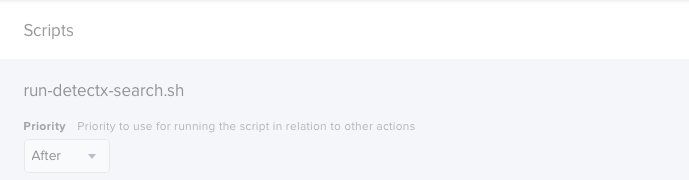
In the Scripts tab, add the run-detectx-search.sh script. No parameters are necessary. Since the script is the only action of the policy, the default priority of “After” is sufficient.
Set an appropriate Scope, Usually all computers in the site.
3) Interpreting the Extension Attribute
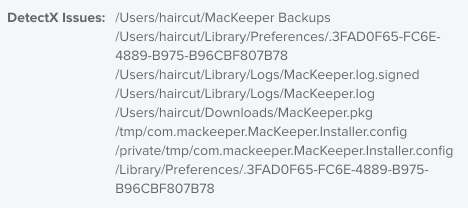
If DetectX finds potentially malicious files, they will be listed in the “DetectX Issues” Extension Attribute in each computers record in Jamf Pro.
The date of the last scan will be followed by either:
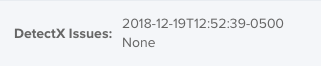
b) If the search completes but no issues are found, the Extension Attribute will be set to None.
c) If the search has not yet completed, or an issue occurred when attempting a search, the Extension Attribute will be blank.
A normal value for the DetectX Issue Extension Attribute in the Jamf Pro computer record looks like:
NOTE that this information will only update during the daily inventory automatically collected by Jamf Pro.
To force update use
/usr/local/bin/jamf recon
The information can also be confirmed by viewing the contents of the local file:
/Library/Application\ Support/JAMF/Addons/DetectX/results.json
More details on this process can be found at:
www.macblog.org/post/integrating-detectx-swift-with-jamf-pro-for-scheduled-malware-scanning/
and
Reporting on the Extension Attribute
To report on devices that may have issues found by DetectX, use a Jamf Advanced Search or Smart Group with a regular expression (regex) as the criteria.

This criteria can be used in an Advanced Search which can email reports daily.
Monitor the Advanced Search to help remediate any potential issues DetectX finds.