Introduction
Setting up WolfCopy Printers
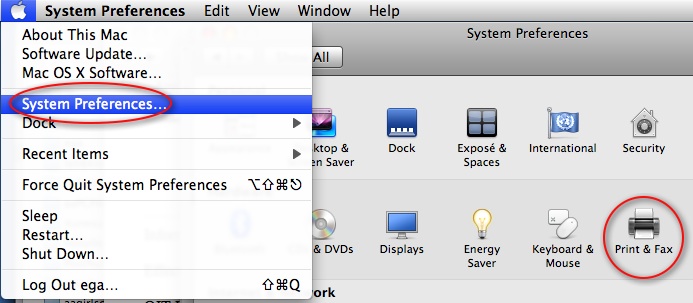
- From the Apple Menu, select System Preferences…
- Click on Print & Fax as shown in Figure 1.

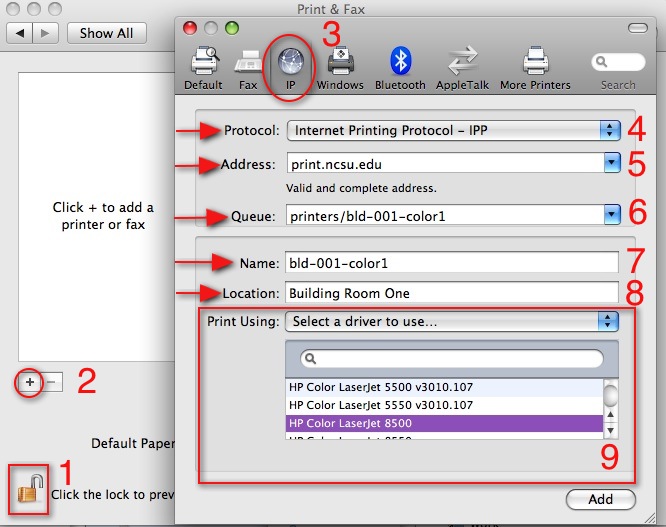
Figure 1. Print & Fax System Preferences. - In the Print & Fax panel, do the following as illustrated in Figure 2:
- Make sure the lock icon in the lower right side is indicating unlocked.
If not, click on it and enter an administrator user name to allow settings changes to be made. - Click the plus sign (+) to add a printer.
- When the printer setup dialog appears, click on IP to choose internet protocol-based printing.
- From the Protocol: pop-up menu, select:
Internet Printing Protocol -IPP. - In the Address: field type:
print.ncsu.edu - In the Queue: field type:
printers/
followed by the name of the WolfCopy printer you wish to use.
For available printers, look at https://print.ncsu.edu:631/printers/
There are several hundred WolfCopy printers. Each one are usually named as follows:
official university building abbreviation – room number – sequence number.
Example: For a single black and white printer in the building named Building with official abbreviation of BLD in Room 1, the name should be:
bld-001-1
For a color printer, the name should be:
bld-001-color1
NOTE: names are always lower case.
So the Queue: field will be:
printers/bld-001-color1 - In the Name: field, type the name of the WolfCopy printer.
Example: bld-001-color1 - In the Location: field, type some text describing the printers physical location.
Example: Building Room One - From the Print Using: pop-up, choose:
Select a driver to use… - From the list, be sure to select the printer model that matches the Printer Driver: field for the printer desired at https://print.ncsu.edu:631/printers
- Click the Add button.
- Use the terminal to send a lpadmin command or
- Print one time and have the print queue on the Macintosh go to hold status.
a) Using Terminal to set the AuthInfoRequired option
Follow these steps:
- Open /Applications/Utilities/Terminal.app
- Type: sudo lpadmin -p <printername> -o auth-info-required=username,password
where <printername> is replaced with the text typed into the Name: field when the printer was created, with the dashes (-) replaced with underscores (_).
Example: sudo lpadmin -p bld_001_color1 -o auth-info-required=username,password
NOTE: The CUPS name of each printer on the machine can be discovered by typing lpstat -v and looking at the listing like this:
device for bld_001_color1: ipp://print.ncsu.edu/printers/bld-001-color1
The CUPS name will be the text after the word “for” and before the first colon(:). - Type the password of the administrator when prompted.
- Verify that the add worked by typing:
lpoptions -p <printername>
Example: lpoptions -p bld_001_color1
The lpoptions should return some text like the following:
media=Letter sides=one-sided finishings=3 copies=1 job-hold-until=no-hold job-priority=50 number-up=1 auth-info-required=username,password job-sheets=none,none printer-info=bld-001-color1 printer-is-accepting-jobs=1 printer-is-shared=0 printer-location=’Building 001 ‘ printer-make-and-model=’HP Color LaserJet 8500’ printer-state=3 printer-state-change-time=1218130564 printer-state-reasons=none printer-type=6328532
As confirmation. look for the text:
auth-info-required=username,password . - Test printing
b) Printing once to set the AuthInfoRequired
This option can be done without Terminal.app and command line tools but can be confusing.
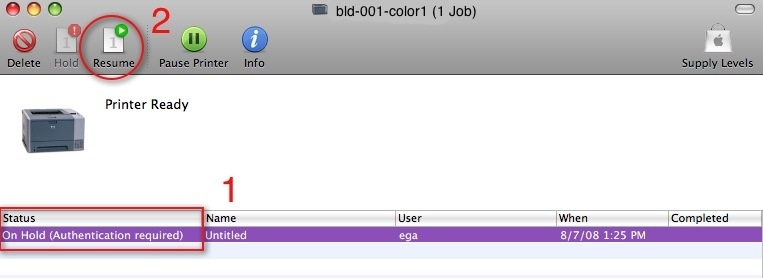
Because the WolfCopy print servers are set to require both encryption and CUPS AuthType Basic, the print subsystem in MacOS X 10.5 will actually stop the print job (but not the print queue or printer) and mark that job with the status:
On Hold (Authentication required)
as shown by number 1 in Figure 3.
Figure 3. Print Queue window
To print and save the AuthInforRequired setting simply click Resume in the tool bar as in number 2 of Figure 3. A dialog asking for Name: and Password: fields will appear. Enter a Unity ID and password and click ok to print. When the print job has successfully finished the CUPS print subsystem will update the printers.conf configuration file to add the correct setting for auth-info-required=username,password. From this point on, the queue should not hold again, and each user on the machine will be prompted in the print dialog for a name and password.
This process must be completed for each WolfCopy printer installed.
Command Line Setup
For those who administer several machines with ARD or are comfortable with using the terminal, here are instructions on how to create and configure CUPS printers for WolfCopy using CUPS command line tools. CUPS printers are created and configured using the lpadmin tool.
Use the command man lpadmin to get details on all of the available options and switches for the tool. The following command should create and configure a printer using the example of bld-001-color1.
sudo lpadmin -p bld-001-color1 -L “bld-001-color1” -E -v ipp://print.ncsu.edu/printers/bld-001-color1 -o auth-info-required=username,password
Looking at the command in detail:
- sudo lpadmin
Executes the command lpadmin as administrative user. - -p bld-001-color1
Sets the name for the new printer. NOTE the lower case p. - -L “bld-001-color1”
Sets the information for CUPS printer. NOTE the quotes. - -E
Makes the printer enabled. NOTE: There are two capital E’s in the man page, and the position in the command string separates enabled from encryption. - -v ipp://print.ncsu.edu/printers/bld-001-color1
Sets the universal resource identifier (URI) that configures the print server (print.ncsu.edu) and the print queue (printers/bld-001-color1). - -o auth-info-required=username,password
Sets the requirement for username and password. - -o error-policy=abort-job
Sets the local print queue so that print jobs are deleted if the printer/printserver cannot be reached. - -P /Library/Printers/PPDs/Contents/Resources/HP\ Color\ LaserJet\ 8500.gz
Gives the PPD to use. NOTE the back slashes to escape the spaces in the names so the unix shells will pass them on correctly. Also, most PPDs under Mac OS X 10.5 are located at this path:
/Library/Printers/PPDs/Contents/Resources.
The switch is an upper case P.
Information on PPD names and where they are stored can be found using the lpinfo command:
lpinfo -m
This will give a very long list that should look something like this:
- Library/Printers/PPDs/Contents/Resources/Brother HL-2070N series CUPS.gz Brother HL-2070N series CUPS
- Library/Printers/PPDs/Contents/Resources/Brother HL-2075N series CUPS.gz Brother HL-2075N series CUPS
- Library/Printers/PPDs/Contents/Resources/Brother HL-2460 series.gz Brother HL-2460 BR-Script3
With these CUPs command line tools, it may also be possible to write a script to automate printer installation, but OIT has not created such a script.
Short Username in Authentication Dialog
In the name and password dialog for CUPS, Mac OS X 10.5 will automatically fill in the user’s full name instead of the short username that is required. This is annoying, as the end user will have to delete the full name and type in a Unity ID each time. To change this behavior, issue the following commands as root in terminal or with ARD Send UNIX…
- defaults write /Library/Preferences/com.apple.NetworkAuthorization UseShortName -bool YES
- defaults write /Library/Preferences/com.apple.NetworkAuthorization UseDefaultName -bool NO
Open up print queue management in cupsd.conf so users can cancel job, restart and re-enable printers.
For many reasons a print job can get stalled or stop or disable the local CUPS print queue. By default, the settings for the cups daemon process, cupsd, are secured so that only administrators can start, stop, disable or enable print queues. Also, only administrators or job owners can cancel print jobs. Since users may just ” Print and Run,” leaving a stopped queue or hung job, these settings can be opened up using the following unix commands.
WARNING:
- The following perl commands must be typed carefully and double checked each time they are sent.
- If incorrectly typed, they can destroy the cupsd.conf file and disable printing completely!
- Spaces are extremely important in these commands!
- perl -p -i -e ‘s/ Resume-Printer//g;’ /private/etc/cups/cupsd.conf
- perl -p -i -e ‘s/ Enable-Printer//g;’ /private/etc/cups/cupsd.conf
- perl -p -i -e ‘s/ Cancel-Job//g;’ /private/etc/cups/cupsd.conf
- launchctl unload /System/Library/LaunchDaemons/org.cups.cupsd.plist
- launchctl load /System/Library/LaunchDaemons/org.cups.cupsd.plist
The three perl commands search the cupsd.conf files for the following strings, replace them with nothing, and save the file:
” Resume-Printer”
” Enable-Printer”
” Cancel-Job”
NOTE: There is a space before each string!
These commands will remove those activities from the restriction rules in cupsd.conf and make them open for use by everyone who is printing.
The two launchctl commands simply restart the cupsd printing system so that the changes will take effect.
Again, use with caution!
How can I set up my own print server using CUPS?
Because we use centralized print servers running on Linux machines, we do not have documentation on setting up CUPS print server software called cupsd. Look for cupsd documentation at https://www.cups.org/.
However, we use the cupsd.conf file:
Setting up cupsd for PAM and Basic Auth
in production with CUPS 1.3.3 servers in case this might help someone.
Getting More Help
For more help or questions on setting up WolfCopy printing from MacOS X 10.5, please contact the NC State Help Desk during business hours:
- 919.515.HELP(4357)


